Pages

Thursday, December 20, 2012

Flame Painted All-Stars

Today, I'm going off the path of minis, but this is still a DIY crafty topic.


Here's a little horn-toot for myself. My son wanted fire shoes. We went shopping but could not find any shoes that already came with flames on them. The next best thing was to buy some plain shoes and have someone paint flames on them. And you know who that someone was. It was me, of course!

My son chose some chambray blue Converse All-Stars. After mulling over the flame design a bit, I got to work. I free-handed it with stiff paintbrush. I started with yellow fabric paint to do the flame centers, then a layer of orange, and finally the red. I only painted the sides facing out. There were ventilation grommets in the instep that interfered with painting there.


The big kid is completely in love with how his shoes turned out. He's been so cute telling everyone that his mom made his cool shoes. Thanks sweetie!

Friday, November 30, 2012

Log Cabin Roof Installation

I had to do the roof in phases. I started with the larger pieces that fit over the main body of the cabin.


I used my not-so-technical system of clothespins to get it in the right place before applying glue.


I applied wood glue and cinched it down with twine.


Afterwards, I tightened up iffy spots with some Zap-a-gap CA glue with a squirt of setting accelerator.

Later, I did the same process for the front gable roofing.


Then, the porch roof and the porch railing on the sides went up. It's looking pretty good!


Coming soon, the ladder, window trim, the door, and the rest of the porch railing!

Tuesday, November 27, 2012

A Fishy New Project

Last Fall, I bought a cute kit. It's supposed to be a gas station/repair garage, named Fascination Station. But who really needs a 1:12 garage laying around?

I talked with the kids and the hubby about what we could turn it into that would be totally different and funky and cool.

We all agreed to make it two separate, but related, shops. The smaller side would become a sushi bar while larger side becomes a fish market. I started snapping up miniature fish and sushi on eBay to use in the setting.

Then, I got distracted. I decided to focus my attention and free time on cooking. I tried out for MasterChef. Shortly after that, I started a new job. People who know me well, know that I have many, many irons in the fire so this one has taken a back burner. Thankfully, the kids are happy that I'm working on something else for them, so they aren't clamoring for me to get this one done.

In fact, I still have not actually glued much together. I have the walls glued into place on the base, but that's it. These photos are from September 2011. Haley was thrilled to help hand me the clamps and glue.


This project will be on hold indefinitely as I have to prioritize my projects. Eric's fort comes first, and it's really close to being done. Haley's house and wrapping up my own quaint little red cottage are further along. However, I will return to this one when I can.

Saturday, October 27, 2012

Cross-stitch Minis

One of my other hobbies is cross-stitching. Mom started teaching me when I was probably in the third grade. I'm not exactly fast or efficient at needlework, but it's something under my belt. I've gotten to the point that it's really a means to an end. I say that because I only cross-stitch things for my dollhouse.

For example, the things I'm sharing today are all made by me to go in or with other things I have.

The patterns came from a very old cross-stitch magazine, the Sept/Oct 1988 issue of Cross Stitch and Country Crafts.

There is the "quilt" which was a very time-consuming bedspread stitched on 22 ct. ivory Hardanger. I think I used 4 skeins of blue DMC floss, by the single strand.  Thank goodness that one's done! I probably put in 50 hours to complete it. I think it turned out great! I used an ivory cotton sheeting fabric for the backside.


I also made the baby blanket.


Mom started the rug pattern, then left off the border.


I decided to make a rug too, but took some liberties with the pattern. I made up some more vines and tulips for the center instead of the pineapples. Also, the tan Aida cloth gives it a nice depth.


 I've made a few pillows on different fabrics.  This is one of the small ones. It has dusty dark pink fabric on the back.


I'm not done with this set yet. I want to make another pillow to match the baby blanket and some other pillows to match the blue and ivory bedspread. I'm even crazy enough that I was considering making another bedspread in all red to simulate a red-work quilt. I want one that's double size, since the blue quilt was only twin size.

Thursday, October 11, 2012

Little Red Cottage Windows

I've been all fired up to work on miniatures in general lately. I looked through all the unfinished projects I have and decided to complete the windows on the red house.

In about 3 evenings, I cut, painted, and installed all the window trim and window plastic. It's made a huge difference in the appearance of the house! I have a little more touch up to do where the joints are, but you get the idea.

The downstairs arched windows
 
 One of the bedroom's round windows

 The "library" or reading nook


Also, I made a fabric seat cushion for the box window seat. This one was pretty easy since it's rectangular, but this will also work with an angled bay window seat. Here's a super simple tutorial on how I did it.


No-Sew Window Seat Tutorial
Take a piece of thick cardboard trimmed about 1/8" smaller than the opening.  Cut a piece of fabric about 3/4" bigger than the cardboard. It doesn't have to be perfect. I started with the narrow sides. Place a tiny line of tacky glue on the cardboard, fold the fabric over, and use some pins to hold the fabric in place. Make sure it's pulled smooth.


The corners were folded in at an angle so it made a nice edge on the front. I used a tiny dab of glue to hold the fabric at that angle. If you use too much glue, it will seep through the fabric. Apply another tiny line of glue along the backing. Fold the fabric up and pull it taut, not too taut so that it distorts the pattern, just enough to make it smooth.


 Pin it in place. Remove the pins when dry.


Slide the cushion in place in the window seat to make sure it fits.  Remove and apply some tacky glue to the seat underside and replace. I used a small can to hold it down until the glue set. If your window seat has thick lumps of glue and fabric, trim those down with a craft knife or small scissors before gluing.  Lumps will make your seat look funny.

To complete the box window, I'm going to use trim around the opening, perhaps frame trim, perhaps  somethings else. You'll just have to wait and see.

Now, I'm on the hunt for some lace to use as curtains. I already looked in my supply cabinet and found nothing good. Also, I need to order some more baseboard trim since I don't have enough to do the whole house.


Monday, September 24, 2012

Little Red Cottage Flooring

My daughter turned four last week. I took a day off work to get things ready for her birthday party. After the party "aftermath" we had a day to play. The kids played with their own things. Eric played video games. Haley played with her new Lalaloopsy toys. And I had the itch to work on the red cottage. 

Sometime in the past year, I bought a sheet of Southern pine random plank flooring. I measured, then cut out the piece for the bottom floor, aiming to be a little big. Then after many little tweaks, I decided it was just right.

I ran to the garage and got out four cans of stain to test on the scrap piece.  Golden Pecan was the winner. I also tried Sedona Red, Golden Oak, and Chestnut. I gave it a coat of satin polyurethane as well.  I did the floor finishing steps outside the house so I wouldn't have any way to slop stain or finish onto the wallpaper. I can be messy that way. I let it dry before gluing it into the house. I used tacky glue and heavy cookbooks to hold it nice and flat.


For the upstairs landing, I resorted to my stash of scrapbooking papers. Nestled in a pack of Close To My Heart papers, was this little gem that looked like lace on a gray background. DING DING DING, we had a winner!

I measured and cut out a sample piece from a brown bag first, to make sure it was right.  Then after making sure it was good, I cut out the actual paper.

I used wall paper paste applied to the wood floor with a sponge brush. When you do this, apply one edge, making sure it's lined up just right, then slowly lay the rest over in a rolling motion.  Press down.


It bubbled up and tried to do weird things, but I have experience with this. A blast of hot air from my hair blow-drier helped it dry so the paper shrank back to where it belonged and stayed glued down.

Then the kids wanted to paint something. Haley had little ceramic leaf that was a birthday present, so they painted it together.


Now, the next thing I need to work on for this cottage is the baseboard molding and window trim. I have been in a very crafty mood lately so I think I will be coming up in the very near future!

Sunday, September 23, 2012

The Willowcrest House

Today, I wanted to share the first dollhouse that I built. Mom and Dad got me the Willowcrest kit for Christmas when I was 14, which was way back in 1992. Mom helped me get it started.


We really didn't have any idea what we were doing. We opened the box, wrote piece names on everything, punched out the pieces, and tried to follow the directions. It was a valuable learning experience.

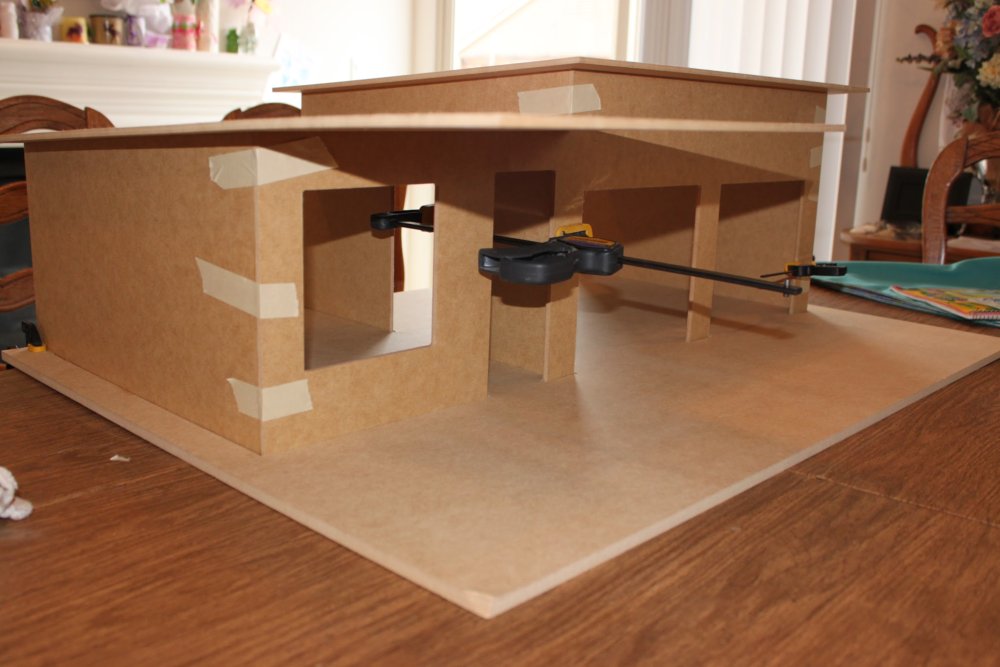
Here are some shots from Christmas 1992 through January 1993. We began the shell build.


Mistake #1 We used hot glue at first. It was lumpy so I had to shave down the lumps with a utility knife. Then we used tacky glue for the rest.

Mistake #2 We didn't sand everything like crazy or make sure that things fit together so they were square.

Mistake #3 We assembled the shell and then realized we had to put up wallpaper. It has really awkward spaces that we couldn't reach at that point.

However, it wasn't the end of the world. We figured things out. To make the best of the awkward staircase, I simply finished off the wood with polyurethane. I tried a funky paper flooring to look more contemporary than antique. Mom also showed me a fun wallpaper technique using torn up brown paper bags decoupaged right onto the walls that simulate leather. I also used a metallic gold paint on the door and window trim in the entry and upper hall.


After a while, Mom got busy doing mom stuff. I was always busy doing teenager stuff. Somehow I'd find a little time here and there to do things.  It took a long time to make noticeable progress. There was a long span where the house was pretty much just sitting in my room with no siding.

One day I saw a show on PBS, New Yankee Workshop, I think. Yes, I used to watch home improvement shows on PBS as a teen. I was weird. Moving on.

That episode of New Yankee Workshop showed this amazing sunburst siding pattern on a shed. I loved it! So that got me fired up to get the siding on the house, just so I could make the sunburst.  After I put the pre-made trim on the barrel roof, it covered up part of the sunburst. I decided if I ever do go back and redo the house in the future, that trim is gone. This picture is from about 1995 or 1996.


After I moved out for college, I found time to really get actively into miniatures. I finished the house when I was 20.  It took me 6 years, start to finish. The thing is, I didn't want to rush. I still made mistakes, but then other things turned out beautifully.

This is the house today. It normally lives on top of the tall chest of drawers in my bedroom, unfurnished.


 I used walnut flooring in the living room and the attic. I also trimmed out the inside of the little attic windows with the walnut flooring.


In the kitchen, I used paper flooring, then used real bricks with cement to make the stove wall and trim around the window and doors.


The bathroom got preformed pink vinyl sheeting that looks like tile. This was the first room I wallpapered. I was very pleased that I managed to get the size right.  I still added baseboard and corner trim to give it a bit more detail.


The bedroom was pretty basic with the its floral wallpaper and cream carpeting.  I did that because the furniture stands out nicely when the house is furnished.


The front door used to open and close. Eventually, the hinges pulled out and messed up the trim. I couldn't get them to really work right after that. Now the door is pinned shut.

The front steps also fell apart a few years ago. We moved and they were a casualty of the move. I still have the pieces so I can repair them. Various pieces of window trim have also fallen off, but I managed to get them repaired quickly.

Someday, I will get the house down and put furniture in it again.  I think when that time comes, I will make some curtains.  The windows could use a little character.