I haven't posted anything on the red Lafayette dollhouse in quite a long time. That's mainly because I haven't done much to this house in a long time. I figured I had to finish it before moving on to Haley's house instead of letting it continue to linger. Here are some details to the finishing touches. I'm not 100% finished, but I'm so close I couldn't wait to share these photos.
I bought some plain 3/8" basswood strips and used that to enhance the exterior trim and also inside around the door and as floor molding. I painted it the same tan as the interior window trim before gluing in place.
The door was a huge pain to get in place. It took tons of sanding and grinding with the Dremel tool to make it work. I added a brass doorknob. I had to enhance the exterior trim (the pediment?) so it wasn't so plain. Also, the shutters were so plain and blah, they needed something. I used crackle medium to get some variation and texture. That also helped them to match the door.
Inside, I added trim around the bay window inside to hide the transitions between wallpaper and paint. It was a huge improvement.
I figured out what to put on the downstairs ceiling to give it
a little something extra. I scared up a printable rug and ran it on the
color laser printer at full page size. It was perfect! After a little
dimensional glue and decoupage, it really completed the scene.
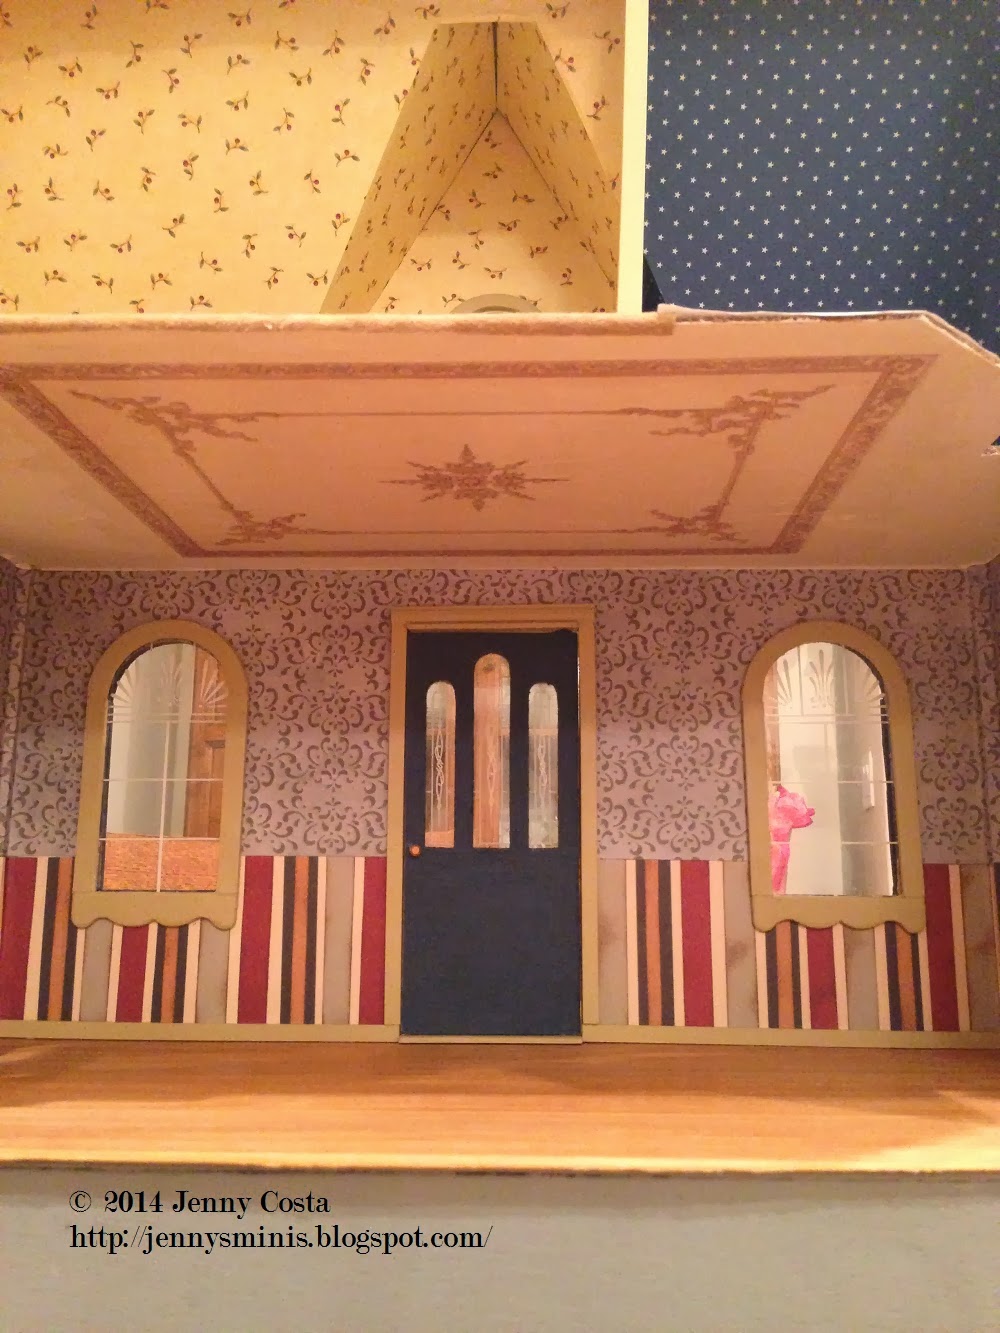
Now, there are only a few minor things left to do. I have some fabric saved to use for curtains. Then, I need to finish up the front porch steps and the spiral stairs. This little house has really turned out well and I'm so pleased with it.
Mainly dollhouses and miniatures in 1:12 scale, cross-stitching, my favorite dolls and toys, as well as other crafty projects.
Showing posts with label Lafayette. Show all posts
Saturday, February 1, 2014
Thursday, October 11, 2012
Little Red Cottage Windows
I've been all fired up to work on miniatures in general lately. I looked through all the unfinished projects I have and decided to complete the windows on the red house.
In about 3 evenings, I cut, painted, and installed all the window trim and window plastic. It's made a huge difference in the appearance of the house! I have a little more touch up to do where the joints are, but you get the idea.
Also, I made a fabric seat cushion for the box window seat. This one was pretty easy since it's rectangular, but this will also work with an angled bay window seat. Here's a super simple tutorial on how I did it.
No-Sew Window Seat Tutorial
Take a piece of thick cardboard trimmed about 1/8" smaller than the opening. Cut a piece of fabric about 3/4" bigger than the cardboard. It doesn't have to be perfect. I started with the narrow sides. Place a tiny line of tacky glue on the cardboard, fold the fabric over, and use some pins to hold the fabric in place. Make sure it's pulled smooth.
The corners were folded in at an angle so it made a nice edge on the front. I used a tiny dab of glue to hold the fabric at that angle. If you use too much glue, it will seep through the fabric. Apply another tiny line of glue along the backing. Fold the fabric up and pull it taut, not too taut so that it distorts the pattern, just enough to make it smooth.
Pin it in place. Remove the pins when dry.
Slide the cushion in place in the window seat to make sure it fits. Remove and apply some tacky glue to the seat underside and replace. I used a small can to hold it down until the glue set. If your window seat has thick lumps of glue and fabric, trim those down with a craft knife or small scissors before gluing. Lumps will make your seat look funny.
To complete the box window, I'm going to use trim around the opening, perhaps frame trim, perhaps somethings else. You'll just have to wait and see.
Now, I'm on the hunt for some lace to use as curtains. I already looked in my supply cabinet and found nothing good. Also, I need to order some more baseboard trim since I don't have enough to do the whole house.
In about 3 evenings, I cut, painted, and installed all the window trim and window plastic. It's made a huge difference in the appearance of the house! I have a little more touch up to do where the joints are, but you get the idea.
The downstairs arched windows
One of the bedroom's round windows
The "library" or reading nook
Also, I made a fabric seat cushion for the box window seat. This one was pretty easy since it's rectangular, but this will also work with an angled bay window seat. Here's a super simple tutorial on how I did it.
No-Sew Window Seat Tutorial
Take a piece of thick cardboard trimmed about 1/8" smaller than the opening. Cut a piece of fabric about 3/4" bigger than the cardboard. It doesn't have to be perfect. I started with the narrow sides. Place a tiny line of tacky glue on the cardboard, fold the fabric over, and use some pins to hold the fabric in place. Make sure it's pulled smooth.
The corners were folded in at an angle so it made a nice edge on the front. I used a tiny dab of glue to hold the fabric at that angle. If you use too much glue, it will seep through the fabric. Apply another tiny line of glue along the backing. Fold the fabric up and pull it taut, not too taut so that it distorts the pattern, just enough to make it smooth.
Pin it in place. Remove the pins when dry.
Slide the cushion in place in the window seat to make sure it fits. Remove and apply some tacky glue to the seat underside and replace. I used a small can to hold it down until the glue set. If your window seat has thick lumps of glue and fabric, trim those down with a craft knife or small scissors before gluing. Lumps will make your seat look funny.
To complete the box window, I'm going to use trim around the opening, perhaps frame trim, perhaps somethings else. You'll just have to wait and see.
Now, I'm on the hunt for some lace to use as curtains. I already looked in my supply cabinet and found nothing good. Also, I need to order some more baseboard trim since I don't have enough to do the whole house.
Monday, September 24, 2012
Little Red Cottage Flooring
My daughter turned four last week. I took a day off work to get things ready for her birthday party. After the party "aftermath" we had a day to play. The kids played with their own things. Eric played video games. Haley played with her new Lalaloopsy toys. And I had the itch to work on the red cottage.
Sometime in the past year, I bought a sheet of Southern pine random plank flooring. I measured, then cut out the piece for the bottom floor, aiming to be a little big. Then after many little tweaks, I decided it was just right.
I ran to the garage and got out four cans of stain to test on the scrap piece. Golden Pecan was the winner. I also tried Sedona Red, Golden Oak, and Chestnut. I gave it a coat of satin polyurethane as well. I did the floor finishing steps outside the house so I wouldn't have any way to slop stain or finish onto the wallpaper. I can be messy that way. I let it dry before gluing it into the house. I used tacky glue and heavy cookbooks to hold it nice and flat.
For the upstairs landing, I resorted to my stash of scrapbooking papers. Nestled in a pack of Close To My Heart papers, was this little gem that looked like lace on a gray background. DING DING DING, we had a winner!
I measured and cut out a sample piece from a brown bag first, to make sure it was right. Then after making sure it was good, I cut out the actual paper.
I used wall paper paste applied to the wood floor with a sponge brush. When you do this, apply one edge, making sure it's lined up just right, then slowly lay the rest over in a rolling motion. Press down.
It bubbled up and tried to do weird things, but I have experience with this. A blast of hot air from my hair blow-drier helped it dry so the paper shrank back to where it belonged and stayed glued down.
Then the kids wanted to paint something. Haley had little ceramic leaf that was a birthday present, so they painted it together.
Now, the next thing I need to work on for this cottage is the baseboard molding and window trim. I have been in a very crafty mood lately so I think I will be coming up in the very near future!
Wednesday, May 16, 2012
Little Red Cottage
I started a little cottage about a year before I started Annika's house. Let's say sometime in 2004, I opened the box and started assembly. No, I didn't take pictures because this happened back in my personal Digital Photo Dark Ages. We had a crummy digital camera and rarely used it.
I was just going through an old notebook of presentations I co-wrote for one of my old jobs and found a to-do list for this house, with notes for Annika's House and the log cabin (which is now Eric's fort) that I still have not finished. The list dates to 2005.
I started with the Lafayette dollhouse by Dura-Craft. At first, I was not positive what I wanted it to look like, but I knew I wanted to go with a patriotic theme of red, white, and blue. My inspiration came from a few pieces of furniture I bought. They were from Robin Betterley's Liberty Bay living room furniture line.
At this point, I don't remember the exact details of assembly. I glued individual square shingles over the entire exterior walls. I added cedar shingles to the roof. I didn't add apex gingerbread trim. It needed to be more simple, more rustic. I went through a number of paint samples until I found the right combination of dusty blue, barn red, and cream.
I custom mixed the gray paint on the base and glued on tiny aquarium rocks.
I wanted to stay consistent with the interior color scheme. I picked up scrapbook papers with muted stripes, stars, and things that would flow together.
I had some thin brown faux-suede fabric leftover from an American Girl doll outfit that became the bedroom carpet.
Now, this little house is still unfinished. I have to complete the tile flooring upstairs, wood flooring downstairs, the baseboard trim, the 1st floor chair-rail trim, the windows, and the door. It has been sitting around in more or less the same state for 2 or 3 years. I have a sheet of pine random plank flooring waiting for me to place downstairs.
Once I get some free time (warm weather = garden time) and other dollhouses finished, I will resume work on this one.
I was just going through an old notebook of presentations I co-wrote for one of my old jobs and found a to-do list for this house, with notes for Annika's House and the log cabin (which is now Eric's fort) that I still have not finished. The list dates to 2005.
I started with the Lafayette dollhouse by Dura-Craft. At first, I was not positive what I wanted it to look like, but I knew I wanted to go with a patriotic theme of red, white, and blue. My inspiration came from a few pieces of furniture I bought. They were from Robin Betterley's Liberty Bay living room furniture line.
At this point, I don't remember the exact details of assembly. I glued individual square shingles over the entire exterior walls. I added cedar shingles to the roof. I didn't add apex gingerbread trim. It needed to be more simple, more rustic. I went through a number of paint samples until I found the right combination of dusty blue, barn red, and cream.
I custom mixed the gray paint on the base and glued on tiny aquarium rocks.
I wanted to stay consistent with the interior color scheme. I picked up scrapbook papers with muted stripes, stars, and things that would flow together.
I had some thin brown faux-suede fabric leftover from an American Girl doll outfit that became the bedroom carpet.
Now, this little house is still unfinished. I have to complete the tile flooring upstairs, wood flooring downstairs, the baseboard trim, the 1st floor chair-rail trim, the windows, and the door. It has been sitting around in more or less the same state for 2 or 3 years. I have a sheet of pine random plank flooring waiting for me to place downstairs.
Once I get some free time (warm weather = garden time) and other dollhouses finished, I will resume work on this one.
Subscribe to:
Posts (Atom)