Pages

Showing posts with label Houseworks. Show all posts

Monday, April 20, 2015

Bricks!

Hi Friends! I'm back with more detail. I'm even a little bit surprised at myself for getting so much done in the last two weeks. I know, my idea of "so much" is different from someone else, but busy moms have only tidbits of time for themselves.

To catch up, I applied paperclay to the entire front portion of the house in phases. I couldn't do the whole wall at once because I am too slow when I have to carve the little bricks with a ruler and X-acto knife. But it turned out well enough and I stopped being so critical of how straight (or not straight and seriously imperfect) my carving turned out after drying.

 
Like before, I overlapped the edges a bit to allow for shrinkage. I trimmed those areas with the X-acto blade after the clay dried to tidy up things. I also enhanced the gaps between some bricks that were not deep enough or shaved down areas that were too thick and lumpy.


I painted up the bricks using a dry brush technique. It took 2 or 3 times to layer up the paint just right. I really like it though. I like it much more than when I did the fireplace on my son's cabin. Also, since I had tried to rush things, I tested painting the damp clay and it didn't work as well as painting dry clay. I stopped and waited for it the whole wall to be ready. Patience paid off.


I ran out of paper clay, so instead of buying another pack, I finished the upper bedroom wall with the white paint and tissue paper stucco technique. It's consistent with the upper portion of the other side wall so it works.


Now I need to seal the painted paperclay bricks with something and apply grout.

I'm starting to think about the windows and doors. I have some bass strip wood I got from Hobby Lobby and Michael's that should take care of most of that.  I also picked up some baseboard molding from Hobby Lobby for the interior trim.

We're entering what we call "birthday season" so my project time will be more limited as birthdays come up and the school year ends. Haley has a science project due this week and Eric has been practicing for the computerized standardized testing at school. There is also the Mini Maker Faire at the end of May.  I know the organizers and I've been invited to show and tell my minis and crafts, but I'm not up to it at the moment. I'd love to go, but I will pass this year.

I will definitely see you again very soon! Bye for now.

Thursday, April 2, 2015

More paperclay progress

 Hi Friends!

Hooray for finding time to work on the house!  I had a furlough day this week. I took care of the important things like taking Kid #1 to the dentist, taking myself to the OB/GYN for a baby check up, and a huge grocery shopping trip. Then I had some time in the afternoon to play with the modern house. I got busy with the paperclay some more.

I managed to shave down the yucky spots along the base and patch with fresh clay. While it was damp, I carved in the brick pattern. I let it dry and it was good.  The secret was adding extra glue and not stretching it too thin. I noticed the clay seems to have a shrinkage direction as well. The patch spots dried really fast.


I started going up the front wall with the paperclay too. My rows got a bit skewed, but I was able to poke them with the X-acto blade to straighten them up mostly. I still need to carve off the excess dried clay around the corners and finesse the ends to go with the pattern on the side wall.


Also, I tested out painting the brick. It looks great!!! I dry brushed four colors over the dry clay.  I used craft acrylic in brick red, brown, darker brown, and gray. Not bad for puttering around for an hour.


Now, my plan is to finish the bricking. Once that is all done, I will probably work on the faux cedar siding for the bedroom's front exterior wall. Then after that, I'll deal with custom doors and windows. I still have to order all the right stripwood pieces and some acrylic window material.

Oh, I almost forgot! I just ordered yet another dollhouse. I sprung for the Beachside Bungalow by RGT. See, I HAD to do it!  Miniatures.com sent out a 40% off coupon for April Fool's Day and there is no way to turn down a deal like that.  I'm already picturing it, maybe yellow, maybe weathered gray wood. Who knows how it will turn out, but yay more fun!

See you again very soon!

Friday, March 13, 2015

Paperclay progress

Hi Friends!

I have been fairly busy lately. I managed to buy a pack of paperclay, but then it took me over a month to find time to do anything with it!

I used the clay on the modern house. After I carefully rolled, applied glue, carved little bricks and all that on the side wall, I was hopeful.

So I let the clay dry and looked at the result. I was very unhappy. It shrank a lot more than when I used it on the log cabin.  I had cut it long and left room for expected shrinkage. Still, it shrank too much and left huge, awkward gaps in the brick pattern. The gaps were not just along the edges, but also in the center of rows.


I know my original idea was that the modern building was partially an old converted brick building with a new small addition on the side. The brick pattern does look wavy and old, but it might be too irregular for me. The gaps along the base are definitely no good.  I'm going to have to make some changes before I do the big front wall.

Setbacks. They happen.

Once the brickwork is good enough, I can paint and grout it. I was planning on making it a dark red dirty brick. The thought of having a some kind of faded logo painted onto the brick even has some appeal.

I also realized that I've talked about my idea sketches without actually posting them! Well, I'm fixing that now.  Here are my sketches. The blue squares are blue Post-It notes I cut out. I drew different window pane patterns on each square to test out what pattern looked the best.


In the next photo, I don't have a kitchen window. I added that later after I started to work on the house.


Hopefully, I'll be able to patch up the wonky clay and get back into business quickly. Between doctor appointments, special events with the kids, and just regular daily life, I've been lucky to find one hour on the weekends to do something fun. By the way, we're expecting another baby, a girl, in August! So my energy has been drained by supporting new life.  Moms, you know what I mean!

Anyhow, I'll try to keep up on the blog, but I can't promise it. I'll be back when I'm not sleeping. Hopefully it won't be another month before I can manage to post again.

Bye for now.

Tuesday, January 20, 2015

Mini Mod Takes Shape

Hi Friends!

I actually got something done on this house yesterday!!! The kids were wrapped up playing video games, so I took over the kitchen floor. The table is currently covered in Haley's Lego creations, and there would have been fits if I touched them. She's been on a kick remodeling her Lego Friends houses into one mega-house.

As for my new and improved modernized house, I made some great progress. Inside, I had glued up the gray stripe wallpaper a few weeks ago. I got around to trimming the excess out of the window openings.


As you might remember, I had sketched the exterior of the house. I began painting to follow that sketch. The undersides of both roof pieces have bright white for the portion inside the house and Valspar English Tea Party (deep dingy brown) for the exterior.


The smaller bedroom wing is now the same deep dingy brown on the exterior walls. And, amazingly, it coordinates with the espresso damask wallpaper. How I managed to match them with never even holding them together is honestly a miracle. I do plan on adding some trim on the long wall to look like modular panels and cedar-stained planks to the brown portion of the front. Since I didn't electrify this house, I will need to buy some battery-operated LED lamps. The bedroom is going to be very dark and dramatic.


Over by the new front door, I painted the upper part one coat of bright white as a base layer. Then, to simulate stucco, I added crumpled white tissue paper with decoupage glue. Eventually I will add some paint to dirty up the stucco. I used my teeny tiny embroidery scissors to cut off the excess tissue.


My next step will be to cover the remaining exterior walls with paper clay sculpted to look like brick. I will need to order a bunch of window and door-making strip wood.  It turns out that all the factory openings are not standard size. I will have to make them all myself.  That's OK. I didn't want standard-looking doors and windows anyway!

One more thing, for Christmas, I had asked Dear Hubby to get me an ELF compact corner kitchen. He didn't have a chance to order it for me, but gave me to OK to order it myself. I ordered the kit version along with a European-style stainless fridge kit. I got the black and gray ebony wood effect (which is now no longer available) for the cabinets and black and silver granite counter-top. I can't wait to put it together! It's going to look so slick and amazing!


Tuesday, November 25, 2014

Taking a Modern Turn

Hi friends. Isn't it funny how ideas can morph and change?  I was losing sight of the fish market and sushi bar. I couldn't really picture the finished product, so I was considering scrapping that idea.

Thanks to Pinterest, I was pinning all these sleek modern architectural houses. It finally struck me to just go modern. Drop the fish idea and do it.

I started sketching the basics of the building. I penciled in the bricks and horizontal wooden siding and I knew it was right. I could actually picture the finished house in my mind's eye. It was going to be beautiful!

Last weekend, I got busy. I got out the Dremel saw and cut out the new entry door and kitchen window on the side was that was previously solid and plain.


I wallpapered the entire bedroom in a fantastic espresso brown damask scrapbook paper. Matching the seams was pretty easy on this room.

I even finished the flooring in both rooms, too. Espresso stripe in the bedroom and black and white check in the main room.


I had to let things dry, so I came back to do the wallpaper in the main room another day, I used this great gray and yellow damask.


This is where I stopped. I have a gray-on-gray stripe for the back wall to accent the huge windows. Yes, they will look like glass garage doors when I'm done.

I also picked up some fat quarters of gray and yellow fabric from Windy Moon Quilts on Pyramid Way.  I'm saving it so I can custom-make some modern furniture. I'm planning on making a couch and armchair. I'm also starting to plan the bedroom furniture.

One of the things I had to come to grips with, was if I was going to make a bathroom or not. In this case, the bathroom is not included. I'm telling myself that it's in the "other" part of the house, you know the part that doesn't really exist.  But I can imagine that it's sleek and modern too. Oh, that gives me another idea for a bathroom room box. (shush, you crazy ideas!)

I've been eyeballing a sleek modern compact kitchen from ELF Miniatures.  They even have tiny color coordinated blinds for the kitchen window! I think this house deserves a nice espresso machine and an orchid on the counter.

Well, that is all for now. I will keep you posted as things progress. See you soon!


Tuesday, November 27, 2012

A Fishy New Project

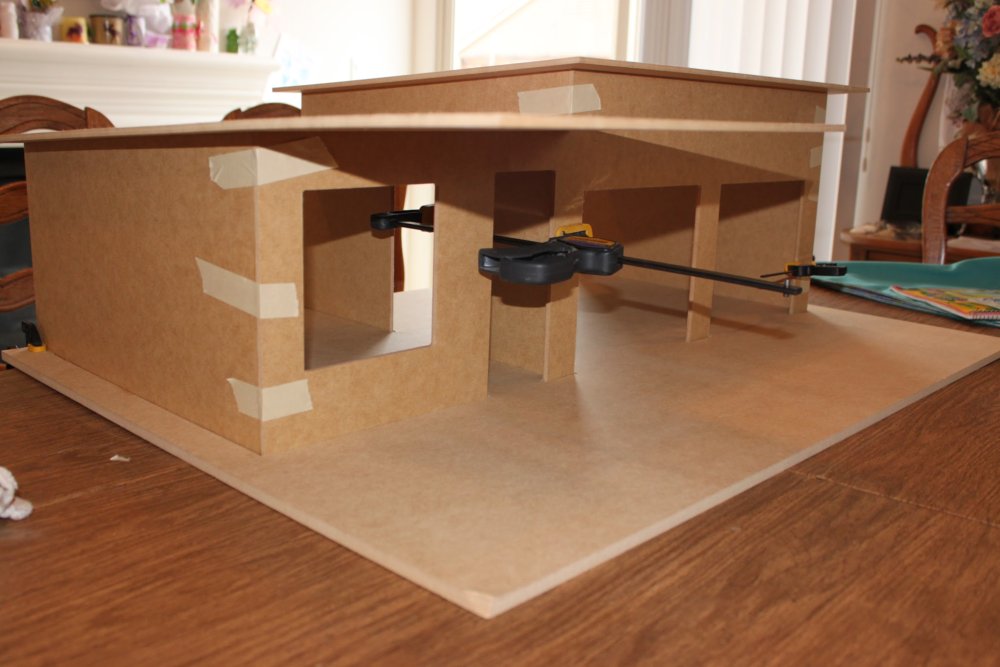
Last Fall, I bought a cute kit. It's supposed to be a gas station/repair garage, named Fascination Station. But who really needs a 1:12 garage laying around?

I talked with the kids and the hubby about what we could turn it into that would be totally different and funky and cool.

We all agreed to make it two separate, but related, shops. The smaller side would become a sushi bar while larger side becomes a fish market. I started snapping up miniature fish and sushi on eBay to use in the setting.

Then, I got distracted. I decided to focus my attention and free time on cooking. I tried out for MasterChef. Shortly after that, I started a new job. People who know me well, know that I have many, many irons in the fire so this one has taken a back burner. Thankfully, the kids are happy that I'm working on something else for them, so they aren't clamoring for me to get this one done.

In fact, I still have not actually glued much together. I have the walls glued into place on the base, but that's it. These photos are from September 2011. Haley was thrilled to help hand me the clamps and glue.


This project will be on hold indefinitely as I have to prioritize my projects. Eric's fort comes first, and it's really close to being done. Haley's house and wrapping up my own quaint little red cottage are further along. However, I will return to this one when I can.