Pages

Saturday, October 27, 2012

Cross-stitch Minis

One of my other hobbies is cross-stitching. Mom started teaching me when I was probably in the third grade. I'm not exactly fast or efficient at needlework, but it's something under my belt. I've gotten to the point that it's really a means to an end. I say that because I only cross-stitch things for my dollhouse.

For example, the things I'm sharing today are all made by me to go in or with other things I have.

The patterns came from a very old cross-stitch magazine, the Sept/Oct 1988 issue of Cross Stitch and Country Crafts.

There is the "quilt" which was a very time-consuming bedspread stitched on 22 ct. ivory Hardanger. I think I used 4 skeins of blue DMC floss, by the single strand.  Thank goodness that one's done! I probably put in 50 hours to complete it. I think it turned out great! I used an ivory cotton sheeting fabric for the backside.


I also made the baby blanket.


Mom started the rug pattern, then left off the border.


I decided to make a rug too, but took some liberties with the pattern. I made up some more vines and tulips for the center instead of the pineapples. Also, the tan Aida cloth gives it a nice depth.


 I've made a few pillows on different fabrics.  This is one of the small ones. It has dusty dark pink fabric on the back.


I'm not done with this set yet. I want to make another pillow to match the baby blanket and some other pillows to match the blue and ivory bedspread. I'm even crazy enough that I was considering making another bedspread in all red to simulate a red-work quilt. I want one that's double size, since the blue quilt was only twin size.

Thursday, October 11, 2012

Little Red Cottage Windows

I've been all fired up to work on miniatures in general lately. I looked through all the unfinished projects I have and decided to complete the windows on the red house.

In about 3 evenings, I cut, painted, and installed all the window trim and window plastic. It's made a huge difference in the appearance of the house! I have a little more touch up to do where the joints are, but you get the idea.

The downstairs arched windows
 
 One of the bedroom's round windows

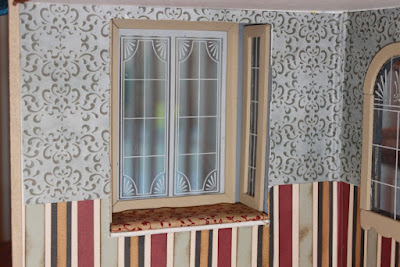
 The "library" or reading nook


Also, I made a fabric seat cushion for the box window seat. This one was pretty easy since it's rectangular, but this will also work with an angled bay window seat. Here's a super simple tutorial on how I did it.


No-Sew Window Seat Tutorial
Take a piece of thick cardboard trimmed about 1/8" smaller than the opening.  Cut a piece of fabric about 3/4" bigger than the cardboard. It doesn't have to be perfect. I started with the narrow sides. Place a tiny line of tacky glue on the cardboard, fold the fabric over, and use some pins to hold the fabric in place. Make sure it's pulled smooth.


The corners were folded in at an angle so it made a nice edge on the front. I used a tiny dab of glue to hold the fabric at that angle. If you use too much glue, it will seep through the fabric. Apply another tiny line of glue along the backing. Fold the fabric up and pull it taut, not too taut so that it distorts the pattern, just enough to make it smooth.


 Pin it in place. Remove the pins when dry.


Slide the cushion in place in the window seat to make sure it fits.  Remove and apply some tacky glue to the seat underside and replace. I used a small can to hold it down until the glue set. If your window seat has thick lumps of glue and fabric, trim those down with a craft knife or small scissors before gluing.  Lumps will make your seat look funny.

To complete the box window, I'm going to use trim around the opening, perhaps frame trim, perhaps  somethings else. You'll just have to wait and see.

Now, I'm on the hunt for some lace to use as curtains. I already looked in my supply cabinet and found nothing good. Also, I need to order some more baseboard trim since I don't have enough to do the whole house.